WordPress Urdu Tutorial

WordPress is a beginner’s friendly web development platform. Developing a website is very easy, once you gain the knowledge of installing WordPress and dashboard options. In WordPress Urdu Tutorial, you will learn about installing WordPress on web host, installing theme, adding pages, creating posts, making menu, site title and URL settings, and essential plugins. Now, let us get started with learning website development.
ورڈپریس نئے ویب ڈویلوپنگ سیکھنے والوں کے لیے بہترین پلیٹ فارم ہے۔ ورڈپریس کی مدد سے ویب سائٹ بنانا اب بہت ہی آسان ہے۔ اس ورڈپریس اردو ٹیوٹوریل میں ہم آپ کو ورڈپریس انسٹال کرنا، پیجز بنانا، پوسٹس لکھنا، مینیوز بنانا، سائٹ ٹائٹل، پلگ اِنز اور دوسری بہت سی سیٹنگز کے بارے میں تفصیل سے بتائیں گے۔
ورڈپریس انسٹال کرنا
For Installing WordPress, a host is necessarily required.
ورڈپریس انسٹال کرنے کے لیے ویب ہوسٹنگ بہت ضروری ہے ہوسٹنگ کے بغیر آپ ورڈپریس انسٹال نہیں کر سکتے۔ جب آپ ویب ہوسٹنگ خرید لیں تو آپ اپنی ہوسٹنگ کے کنٹرول پینل میں جائیں اور وہاں سے ورڈپریس انسٹال کریں۔ زیادہ تر ویب ہوسٹس ون کلک انسٹالیشن کا آپشن دیتے ہیں تاکہ ان کے کسٹمرز کو ورڈپریس انسٹال کرنے میں کوئی پریشانی نہ ہو۔
Almost all web hosts provide “one click installation” option to their customers. When you will register a domain and pay for a hosting plan for your website, your web host will tell you about “one click installation”. So, you can easily install WordPress on a web host. There are some web hosting provider, which provide special WordPress hosting plans.
اپنی ویب سائٹ کے لیے تھیم یا ڈیزائن کا انتخاب کریں
سب سے پہلے، آپ اپنی ویب سائٹ کے لیے کوئی تھیم سیلیکٹ کریں۔ آپ ورڈپریس تھیم گیلری سے اپنی ویب سائٹ کے مطابق کوئی بھی تھیم سیلیکٹ کر سکتے ہیں۔ اس کے علاوہ آپ کسی دوسری ویب سائٹ سے تھیم خرید بھی سکتے ہیں۔
First of all, select a theme for your website. You may select a theme from the WordPress repository or browse this free themes gallery. You will find very nice themes in this gallery, which are responsive and designed with bootstrap elements.
To choose a theme go to Appearance -> Themes -> Add New -> Upload Theme -> Activate.
پیجز اور پوسٹس شامل کرنا
WordPress gives one default page (sample page), and one default post (Hello world!), which you can see on your website. You can delete the default page and post and can add new ones.
نیا پیج شامل کرنے کے لیے
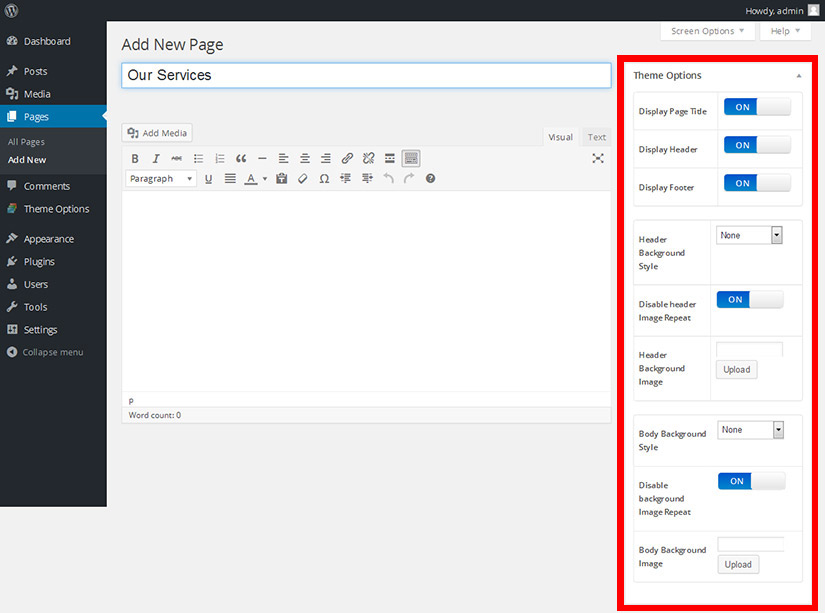
For handling pages, WordPress has given “Pages” tool on the dashboard.
Select Pages -> Add New to add a new page.
When you choose add new page, you are directly moved to the editor. You can add text, media and link in your page with the available editing tools. After creating the page, you can preview it as well. “Publish” your page in the end.
The options being shown on the right side, are called theme options, which are available in TemplateToaster generated theme.
نئی پوسٹ لکھنے کے لیے
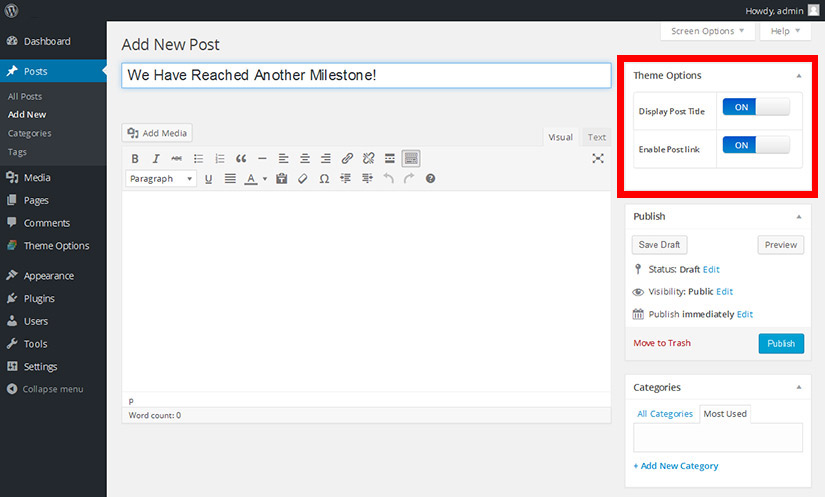
Here’s what you need to do for creating a new post. Look along the sidebar in dashboard for Posts -> Add New.
Fill in the post title, write the post, add a media, and simply press the “Publish” button showing on the right side of the page. This is how, you’ve created a post on your website.
Here too, we’ve the theme options available for post title and post link.
پیجز اور پوسٹس کے لیے رِیڈنگ سیٹنگ
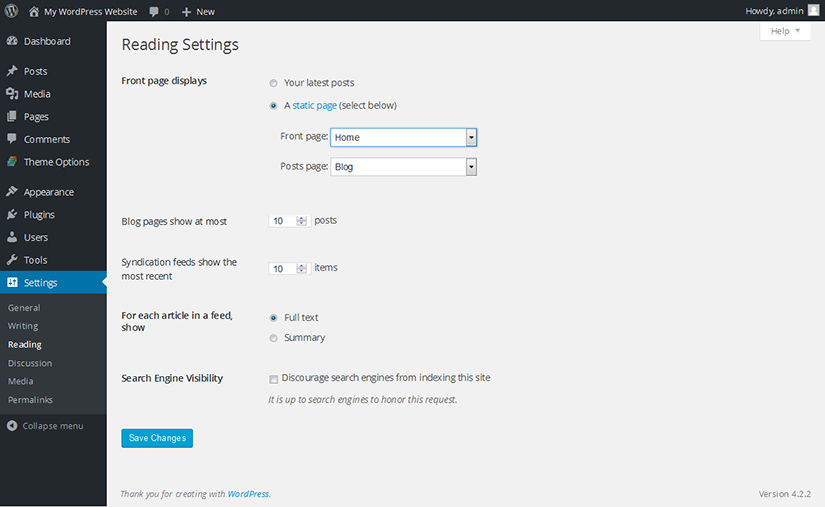
فرنٹ پیجز
From this option, you can select a particular page, which your visitors will see when they first visit your website. Let’s say, you want that visitors would see your “Home” page very first page when they visit your site.
Go to the Settings -> Reading -> select the static page radio button. Select the page that you want to make static from the drop down list.
پوسٹ پیج
Select the Blog page from the “Posts page” drop-down list as shown in the image.
Once you save the changes, the front page will become static and all your posts will be shown on Blog page.
پوسٹس کے لیے ڈِسکشن سیٹنگ
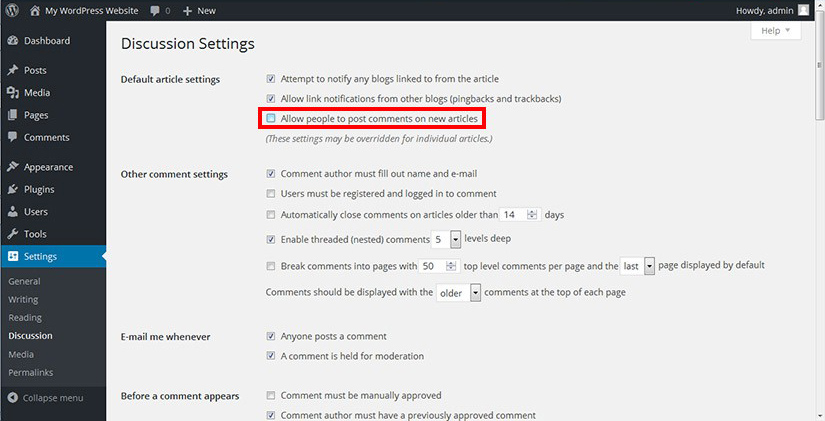
WordPress gives you the choice whether you want to enable readers to comment on your blog posts or not. By default, the comments are enabled on blogs, which you can turn off in the following way.
Settings -> discussions -> uncheck Allow Comments
We would suggest you to read about how you can prevent you site from comment spam if you don’t want to disable the comments on your posts.
ویب سائٹ کے لیے جنرل سیٹنگ
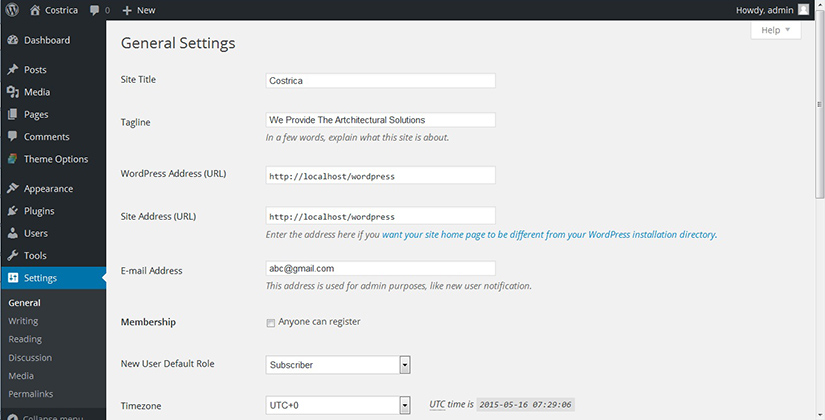
We have the “Settings -> General” tool on the dashboard for basic configuration settings of the website. From general settings as shown in the above image, you can customize site’s title, tagline, URL, mention an E-mail address, and can turn on the registration on site.
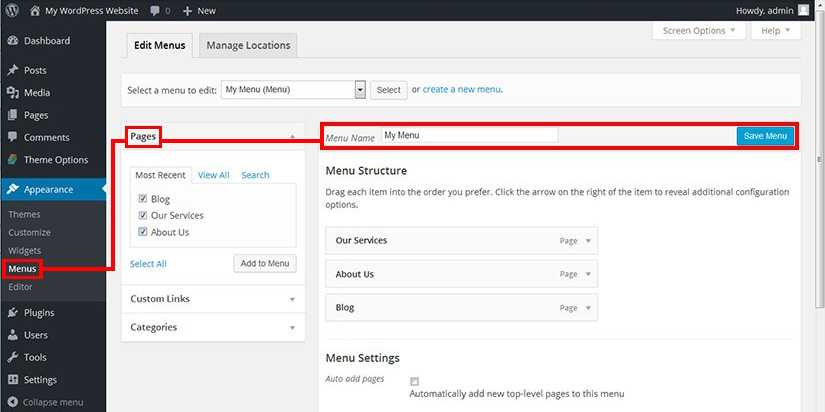
You can create your own menu and add your pages into it from the “Menus” tool, which resides inside “Appearance”.
Appearance -> Menus -> create a new menu
مینیو میں کیٹیگریز یا آئٹمز شامل کرنا
You can add pages, custom links and categories in the menu. For this, select the menu that you’ve created in the above step. Then, find the items you want to add in the menu, e.g. if you want to add the “Blog” page in the menu. So, select this page and press “Add to Menu”. Make sure that you’ve pressed “Save Menu” in the end. Similar to the pages, you can add custom links and categories to the menu.
مینیو سٹرکچر
You can arrange the menu items in preferred order by simply dragging them from their position and dropping at the desired level.
ورڈپریس پلگ اِنز
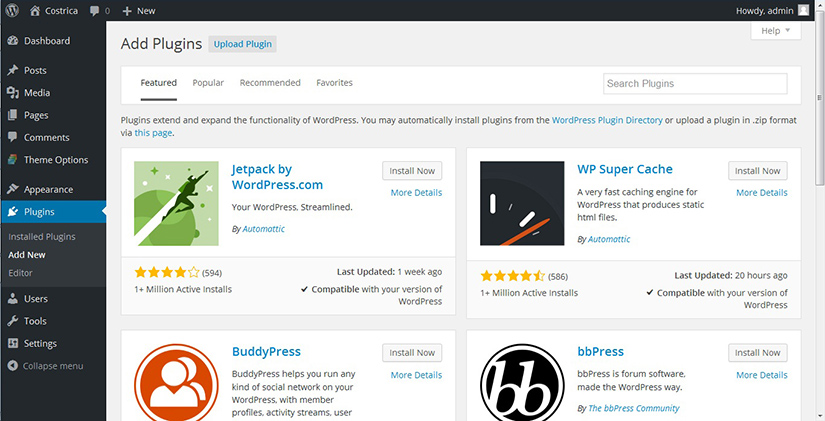
WordPress has a great attribute that a user may extend website’s capabilities using plugins. If you have a plan to add a custom functionality in your website, you may browse the plugin repository from the dashboard itself.
Simply, go to Plugins -> Add New.
In fact, if you don’t need your website to perform custom functions, yet, you should use four plugins in your website for reason that they would help you out for keep your website in optimum state. And that’s why, they are considered essential plugins. You would like to read about our previous post, which tells in detail about the Essential Plugins for a WordPress Website.
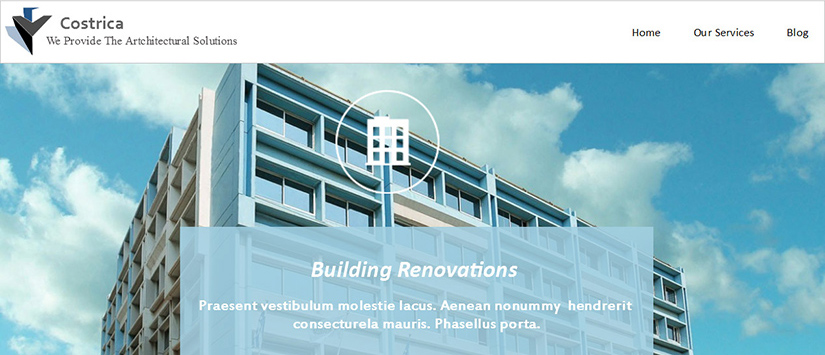
This is how our website looks like. It has three pages, “Home”, “Our Service”, and “Blog”. Website title and tagline are as per we’ve defined while configuring making General Settings. And, the web design (theme) has been taken from Template Toaster’s themes gallery.


